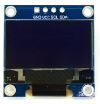
SSD1306是一塊常見的小螢幕,解析度為128*64,色彩為單色。
這邊使用的是I2C版本做Demo(也有SPI的但我手邊沒有)。
在Java中要與硬體溝通(GPIO, I2C, SPI, PWM, Serial)通常都會用PI4J這個底層套件包做通訊。
在這個範例中使用的是PI4J v1.4版,最新版是PI4J v2但是我們要用的SSD1306 Lib沒有支援到最新版所以需要降版本使用。
目前PI4J v1.4與Raspberry Pi搭配使用時,會跳出Unable to load [libpi4j.so] using path這個錯誤,因為PI4J也要依賴Wiring Pi才可以運作,所以我們要先在Raspberry Pi作業系統上安裝WiringPi。
官方說明:https://pi4j.com/1.4/dependency.html
sudo apt-get remove wiringpi -y
sudo apt-get --yes install git-core gcc make
cd ~
git clone https://github.com/WiringPi/WiringPi --branch master --single-branch wiringpi
cd ~/wiringpi
sudo ./build
安裝完後就把環境準備好了。
接下來將SSD1306與Raspberry Pi做連接,I2C很方便我們只要把4條線都接上即可。
| SSD1306 | Raspberry Pi |
| GND | 任一GND |
| VCC | 任一3.3V |
| SCL | SCL (Pin5) |
| SDA | SDA (Pin3) |
連接好後,先來檢查I2C的位址:
sudo i2cdetect -y 1
sudo i2cdetect -y 1
     0  1  2  3  4  5  6  7  8  9  a  b  c  d  e  f
00:                         -- -- -- -- -- -- -- --
10: -- -- -- -- -- -- -- -- -- -- -- -- -- -- -- --
20: -- -- -- -- -- -- -- -- -- -- -- -- -- -- -- --
30: -- -- -- -- -- -- -- -- -- -- -- -- 3c -- -- --
40: -- -- -- -- -- -- -- -- -- -- -- -- -- -- -- --
50: -- -- -- -- -- -- -- -- -- -- -- -- -- -- -- --
60: -- -- -- -- -- -- -- -- -- -- -- -- -- -- -- --
70: -- -- -- -- -- -- -- --
3c就是我們SSD1306的I2C位址,不同地方買的有可能會不一樣,目前主流預設的位址都是3c。
確認好位址後,就可以開始撰寫主程式囉。
場景轉到Java專案中,首先在pom.xml加入套件:
測試過了幾套Lib覺得這個比較好用:https://github.com/entrusc/Pi-OLED
<dependencies>
  <dependency>
    <groupId>com.pi4j</groupId>
    <artifactId>pi4j-core</artifactId>
    <version>1.4</version>
  </dependency>
  <dependency>
    <groupId>de.pi3g.pi</groupId>
    <artifactId>pi-oled</artifactId>
    <version>1.2</version>
  </dependency>
</dependencies>
如果專案有使用到module-info.java架構,記得把Lib加進去:
requires pi4j.core;
requires pi.oled;
接下來就可以使用了:
try{
//初始化.連接螢幕
OLEDDisplay display = new OLEDDisplay();
//清除畫面,不清除的話就會一直疊加上去
display.clear();
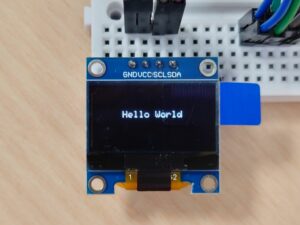
//使用內建字體顯示文字,顯示在畫面中央,高度在y=25的位置
display.drawStringCentered("Hello World", de.pi3g.pi.oled.Font.FONT_5X8, 25, true);
display.update();
}catch (Exception e){
e.printStackTrace();
}
效果:
假如I2C位址不是預設的,則可以在產生OLEDDisplay物件時進行設定:
OLEDDisplay display = new OLEDDisplay(1, 0x3c);
指定I2C BUS的號碼(預設為1)、設定I2C位址。
但上面的效果常常不是我們想要的,而且不能顯示中文,為了達到最大化靈活性,這邊我會用圖片的方法來顯示我們想要的任何畫面(或文字)。
以下是一個把文字轉換為圖檔的範例,因為螢幕是128*64,所以畫布大小都是用128*64。
private BufferedImage getImg(String text){
  //螢幕解析度
  int width = 128;
  int height = 64;

  // 螢幕是吃 BufferedImage 物件
  BufferedImage image = new BufferedImage(width, height, BufferedImage.TYPE_BYTE_BINARY);

  // 使用 Graphics 繪圖
  Graphics graphics = image.getGraphics();

  // 指定背景顏色為黑色,並填滿
  graphics.setColor(Color.BLACK);
  graphics.fillRect(0, 0, width, height);

  // 文字為白色,並指定字體產生文字
  graphics.setColor(Color.WHITE);
  Font font = new Font("Arial", Font.PLAIN, 40);
  graphics.setFont(font);

  // 取得文字字串的寬高,顯示在畫面中間
  FontMetrics fontMetrics = graphics.getFontMetrics(font);
  int textWidth = fontMetrics.stringWidth(text);
  int textHeight = fontMetrics.getHeight();
  int x = (width - textWidth) / 2;
  int y = (height - textHeight) / 2 + fontMetrics.getAscent();

  // 繪製文字
  graphics.drawString(text, x, y);

  // 釋放資源
  graphics.dispose();

  return image;
}
把產生的BufferedImage顯示到螢幕上:
display.clear();
//因圖檔大小=螢幕大小,所以從0,0處開始顯示
display.drawImage(getImg("猛禽洛"),0, 0);
display.update();
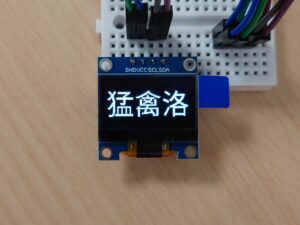
利用BufferedImage就可以顯示任何想要的畫面了!
-END-
發佈留言