
JavaFx 是可以建立跨平台的圖形介面程式的一個平台。
在前一篇中,我們有介紹如何在現有的架構上執行JavaFx APP,但還是遇到了許多問題。
這篇文章中整理了這幾天的研究成果,將整個環境建置流程記錄下來,減少以後遇到的問題。
在這邊我們使用64位元的作業系統,理論上運作效能會比較快之外,我發現在視窗放到最大時,滑鼠指標不會一直閃爍,而且在論壇逛完後好像也沒有人有遇到問題。
1. 下載 Raspberry Pi OS 64bit
到這邊下載最新版的映象檔:https://downloads.raspberrypi.org/raspios_arm64/images/
本文以 2020-08-20-raspios-buster-arm64.zip 為例
2.安裝 Raspberry Pi OS
下載到桌面後,解壓縮出一個2020-08-20-raspios-buster-arm64.img,使用rufus程式將img檔寫進空的記憶卡中。
記憶卡製作完成後,裝上Raspberry Pi 4並啟動,按照步驟將系統設定完成,最後一步的時候會詢問進行系統更新,請讓他更新,需要花一段時間。
更新完成後,請重新開機。
調整GPU記憶體,增加UI性能:
參考這邊文章:https://www.raspberrypi.org/documentation/configuration/raspi-config.md
在Terminal中執行sudo raspi-config
選擇Performance Options -> GPU Memory
將顯示記憶體大小設定至256MB,存檔重新開機。
3.Java 環境安裝
此版本的Raspberry Pi OS是不包含Java的,可以在Terminal中輸入 java -version 進行檢查。
pi@raspberrypi:~ $ java -version
bash: java:命令找不到
下載Liberica的JDK來使用:https://bell-sw.com/pages/downloads/#/java-15-current
需要搜尋64位元Linux版的ARM,Package選擇Full SDK,複製deb的下載連結,貼到Terminal中下載。
這邊以Liberica Full JDK 15.0.2+10 ARM 64 bit for Linux為例:
wget https://download.bell-sw.com/java/15.0.2+10/bellsoft-jdk15.0.2+10-linux-aarch64-full.deb
pi@raspberrypi:~ $ wget https://download.bell-sw.com/java/15.0.2+10/bellsoft-jdk15.0.2+10-linux-aarch64-full.deb
--2021-01-25 15:53:48--  https://download.bell-sw.com/java/15.0.2+10/bellsoft-jdk15.0.2+10-linux-aarch64-full.deb
正在查找主機 download.bell-sw.com (download.bell-sw.com)... 104.18.0.179, 104.18.1.179, 2606:4700::6812:1b3, ...
正在連接 download.bell-sw.com (download.bell-sw.com)|104.18.0.179|:443... 連上了。
已送出 HTTP 要求,正在等候回應... 200 OK
長度: 248214428 (237M) [application/x-debian-package]
儲存到:`bellsoft-jdk15.0.2+10-linux-aarch64-full.deb'

bellsoft-jdk15.0.2+10-linux-aarch64-full.deb    100%[=====================================================================================================>] 236.71M  6.33MB/s  於 35s

2021-01-25 15:54:23 (6.82 MB/s) - 已儲存 `bellsoft-jdk15.0.2+10-linux-aarch64-full.deb' [248214428/248214428]安裝
安裝Java JDK 15
sudo apt-get install ./bellsoft-jdk15.0.2+10-linux-aarch64-full.deb
pi@raspberrypi:~ $ sudo apt-get install ./bellsoft-jdk15.0.2+10-linux-aarch64-full.deb
正在讀取套件清單... 完成
正在重建相依關係
正在讀取狀態資料... 完成
Note, selecting 'bellsoft-java15-full' instead of './bellsoft-jdk15.0.2+10-linux-aarch64-full.deb'
The following packages were automatically installed and are no longer required:
  libbluetooth3 lxplug-volume
Use 'sudo apt autoremove' to remove them.
下列【新】套件將會被安裝:
  bellsoft-java15-full
升級 0 個,新安裝 1 個,移除 0 個,有 0 個未被升級。
需要下載 0 B/248 MB 的套件檔。
此操作完成之後,會多佔用 0 B 的磁碟空間。
下載:1 /home/pi/bellsoft-jdk15.0.2+10-linux-aarch64-full.deb bellsoft-java15-full arm64 15.0.2+10 [248 MB]
選取了原先未選的套件 bellsoft-java15-full。
(讀取資料庫 ... 目前共安裝了 90302 個檔案和目錄。)
正在準備解包 .../bellsoft-jdk15.0.2+10-linux-aarch64-full.deb……
Unpacking bellsoft-java15-full (15.0.2+10) ...
設定 bellsoft-java15-full (15.0.2+10) ...
update-alternatives: 在自動模式下以 /usr/lib/jvm/bellsoft-java15-full-aarch64/bin/jaotc 來提供 /usr/bin/jaotc (jaotc)
update-alternatives: 在自動模式下以 /usr/lib/jvm/bellsoft-java15-full-aarch64/bin/jar 來提供 /usr/bin/jar (jar)
update-alternatives: 在自動模式下以 /usr/lib/jvm/bellsoft-java15-full-aarch64/bin/jarsigner 來提供 /usr/bin/jarsigner (jarsigner)
update-alternatives: 在自動模式下以 /usr/lib/jvm/bellsoft-java15-full-aarch64/bin/java 來提供 /usr/bin/java (java)
update-alternatives: 在自動模式下以 /usr/lib/jvm/bellsoft-java15-full-aarch64/bin/javac 來提供 /usr/bin/javac (javac)
update-alternatives: 在自動模式下以 /usr/lib/jvm/bellsoft-java15-full-aarch64/bin/javadoc 來提供 /usr/bin/javadoc (javadoc)
update-alternatives: 在自動模式下以 /usr/lib/jvm/bellsoft-java15-full-aarch64/bin/javap 來提供 /usr/bin/javap (javap)
update-alternatives: 在自動模式下以 /usr/lib/jvm/bellsoft-java15-full-aarch64/bin/jcmd 來提供 /usr/bin/jcmd (jcmd)
update-alternatives: 在自動模式下以 /usr/lib/jvm/bellsoft-java15-full-aarch64/bin/jconsole 來提供 /usr/bin/jconsole (jconsole)
update-alternatives: 在自動模式下以 /usr/lib/jvm/bellsoft-java15-full-aarch64/bin/jdb 來提供 /usr/bin/jdb (jdb)
update-alternatives: 在自動模式下以 /usr/lib/jvm/bellsoft-java15-full-aarch64/bin/jdeprscan 來提供 /usr/bin/jdeprscan (jdeprscan)
update-alternatives: 在自動模式下以 /usr/lib/jvm/bellsoft-java15-full-aarch64/bin/jdeps 來提供 /usr/bin/jdeps (jdeps)
update-alternatives: 在自動模式下以 /usr/lib/jvm/bellsoft-java15-full-aarch64/bin/jfr 來提供 /usr/bin/jfr (jfr)
update-alternatives: 在自動模式下以 /usr/lib/jvm/bellsoft-java15-full-aarch64/bin/jhsdb 來提供 /usr/bin/jhsdb (jhsdb)
update-alternatives: 在自動模式下以 /usr/lib/jvm/bellsoft-java15-full-aarch64/bin/jimage 來提供 /usr/bin/jimage (jimage)
update-alternatives: 在自動模式下以 /usr/lib/jvm/bellsoft-java15-full-aarch64/bin/jinfo 來提供 /usr/bin/jinfo (jinfo)
update-alternatives: 在自動模式下以 /usr/lib/jvm/bellsoft-java15-full-aarch64/bin/jlink 來提供 /usr/bin/jlink (jlink)
update-alternatives: 在自動模式下以 /usr/lib/jvm/bellsoft-java15-full-aarch64/bin/jmap 來提供 /usr/bin/jmap (jmap)
update-alternatives: 在自動模式下以 /usr/lib/jvm/bellsoft-java15-full-aarch64/bin/jmod 來提供 /usr/bin/jmod (jmod)
update-alternatives: 在自動模式下以 /usr/lib/jvm/bellsoft-java15-full-aarch64/bin/jpackage 來提供 /usr/bin/jpackage (jpackage)
update-alternatives: 在自動模式下以 /usr/lib/jvm/bellsoft-java15-full-aarch64/bin/jps 來提供 /usr/bin/jps (jps)
update-alternatives: 在自動模式下以 /usr/lib/jvm/bellsoft-java15-full-aarch64/bin/jrunscript 來提供 /usr/bin/jrunscript (jrunscript)
update-alternatives: 在自動模式下以 /usr/lib/jvm/bellsoft-java15-full-aarch64/bin/jshell 來提供 /usr/bin/jshell (jshell)
update-alternatives: 在自動模式下以 /usr/lib/jvm/bellsoft-java15-full-aarch64/bin/jstack 來提供 /usr/bin/jstack (jstack)
update-alternatives: 在自動模式下以 /usr/lib/jvm/bellsoft-java15-full-aarch64/bin/jstat 來提供 /usr/bin/jstat (jstat)
update-alternatives: 在自動模式下以 /usr/lib/jvm/bellsoft-java15-full-aarch64/bin/jstatd 來提供 /usr/bin/jstatd (jstatd)
update-alternatives: 在自動模式下以 /usr/lib/jvm/bellsoft-java15-full-aarch64/bin/keytool 來提供 /usr/bin/keytool (keytool)
update-alternatives: 在自動模式下以 /usr/lib/jvm/bellsoft-java15-full-aarch64/bin/rmid 來提供 /usr/bin/rmid (rmid)
update-alternatives: 在自動模式下以 /usr/lib/jvm/bellsoft-java15-full-aarch64/bin/rmiregistry 來提供 /usr/bin/rmiregistry (rmiregistry)
update-alternatives: 在自動模式下以 /usr/lib/jvm/bellsoft-java15-full-aarch64/bin/serialver 來提供 /usr/bin/serialver (serialver)
選擇預設的javac (應該只會有一個,沒得選)
pi@raspberrypi:~ $ sudo update-alternatives --config javac
替換群組 javac(提供 /usr/bin/javac)只有一個替換項目:/usr/lib/jvm/bellsoft-java15-full-aarch64/bin/javac
無可設定。
選擇預設的java (應該只會有一個again,沒得選)
pi@raspberrypi:~ $ sudo update-alternatives --config java
替換群組 java(提供 /usr/bin/java)只有一個替換項目:/usr/lib/jvm/bellsoft-java15-full-aarch64/bin/java
無可設定。
再次確認Java版本 java -version
pi@raspberrypi:~ $ java -version
openjdk version "15.0.2" 2021-01-19
OpenJDK Runtime Environment (build 15.0.2+10)
OpenJDK 64-Bit Server VM (build 15.0.2+10, mixed mode)
很好,Java環境安裝成功!
4.0.使用 IntelliJ 建立一個JavaFx測試程式
接下來回到PC上。
IntelliJ 的安裝方式就不多說了,這邊直接從建立新專案開始講起。
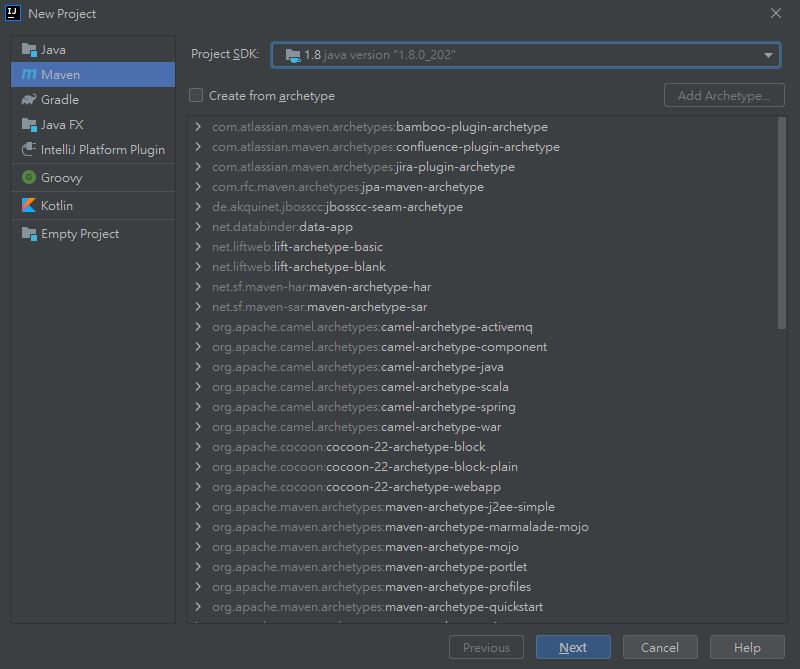
新增一個Maven專案,左欄選擇Maven,Project SDK預設即可 (選擇最新的應該也可以,待測),之後直接Next。
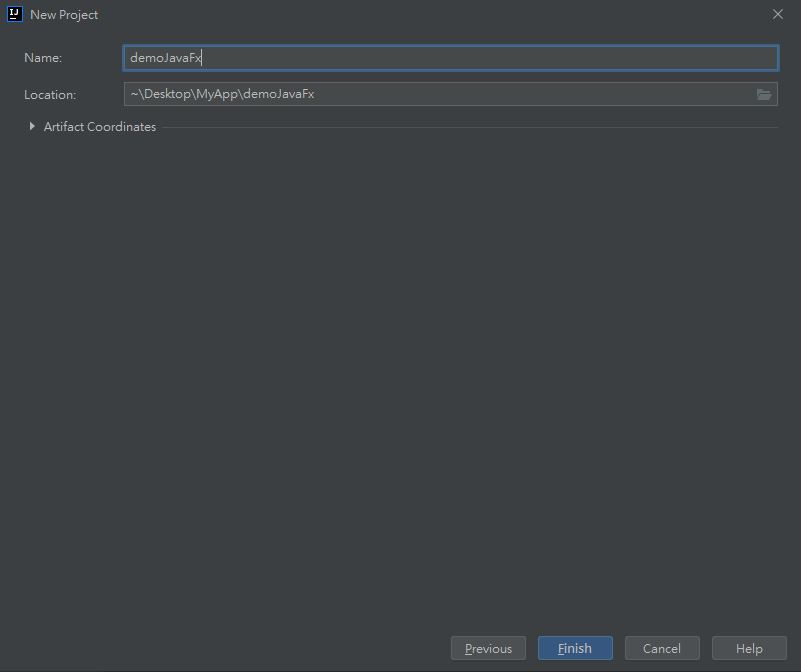
輸入專案名稱 -> Finish
這時候預設的 pom.xml 會長這個樣子:
<?xml version="1.0" encoding="UTF-8"?>
<project xmlns="http://maven.apache.org/POM/4.0.0"
         xmlns:xsi="http://www.w3.org/2001/XMLSchema-instance"
         xsi:schemaLocation="http://maven.apache.org/POM/4.0.0 http://maven.apache.org/xsd/maven-4.0.0.xsd">
    <modelVersion>4.0.0</modelVersion>

    <groupId>org.example</groupId>
    <artifactId>demoJavaFx</artifactId>
    <version>1.0-SNAPSHOT</version>

    <properties>
        <maven.compiler.source>8</maven.compiler.source>
        <maven.compiler.target>8</maven.compiler.target>
    </properties>

</project>
我們要在裡面加上 <dependencies> 與 <plugins> 並且在 <properties> 新增編碼方式,整個 pom.xml 會變成如下:
<?xml version="1.0" encoding="UTF-8"?>
<project xmlns="http://maven.apache.org/POM/4.0.0"
         xmlns:xsi="http://www.w3.org/2001/XMLSchema-instance"
         xsi:schemaLocation="http://maven.apache.org/POM/4.0.0 http://maven.apache.org/xsd/maven-4.0.0.xsd">
    <modelVersion>4.0.0</modelVersion>

    <groupId>org.example</groupId>
    <artifactId>demoJavaFx</artifactId>
    <version>1.0-SNAPSHOT</version>

    <properties>
        <project.build.sourceEncoding>UTF-8</project.build.sourceEncoding>
        <maven.compiler.source>8</maven.compiler.source>
        <maven.compiler.target>8</maven.compiler.target>
    </properties>

    <dependencies>
        <dependency>
            <groupId>org.openjfx</groupId>
            <artifactId>javafx-base</artifactId>
            <version>11</version>
            <classifier>linux</classifier>
        </dependency>
        <dependency>
            <groupId>org.openjfx</groupId>
            <artifactId>javafx-base</artifactId>
            <version>11</version>
            <classifier>win</classifier>
        </dependency>
        <dependency>
            <groupId>org.openjfx</groupId>
            <artifactId>javafx-controls</artifactId>
            <version>11</version>
            <classifier>linux</classifier>
        </dependency>
        <dependency>
            <groupId>org.openjfx</groupId>
            <artifactId>javafx-controls</artifactId>
            <version>11</version>
            <classifier>win</classifier>
        </dependency>
        <dependency>
            <groupId>org.openjfx</groupId>
            <artifactId>javafx-fxml</artifactId>
            <version>11</version>
            <classifier>linux</classifier>
        </dependency>
        <dependency>
            <groupId>org.openjfx</groupId>
            <artifactId>javafx-fxml</artifactId>
            <version>11</version>
            <classifier>win</classifier>
        </dependency>
        <dependency>
            <groupId>org.openjfx</groupId>
            <artifactId>javafx-graphics</artifactId>
            <version>11</version>
            <classifier>linux</classifier>
        </dependency>
        <dependency>
            <groupId>org.openjfx</groupId>
            <artifactId>javafx-graphics</artifactId>
            <version>11</version>
            <classifier>win</classifier>
        </dependency>
    </dependencies>

    <build>
        <plugins>
            <plugin>
                <groupId>org.apache.maven.plugins</groupId>
                <artifactId>maven-shade-plugin</artifactId>
                <version>3.2.2</version>
                <executions>
                    <execution>
                        <phase>package</phase>
                        <goals>
                            <goal>shade</goal>
                        </goals>
                        <configuration>
                            <transformers>
                                <transformer implementation="org.apache.maven.plugins.shade.resource.ManifestResourceTransformer">
                                    <mainClass>com.test.Launcher</mainClass>
                                </transformer>
                            </transformers>
                        </configuration>
                    </execution>
                </executions>
            </plugin>
        </plugins>
    </build>

</project>
之後按下右上方的Reload來同步Maven。
注意 <plugin> 中的 <mainClass> 欄位,這個是程式進入點,待會會修改這邊。
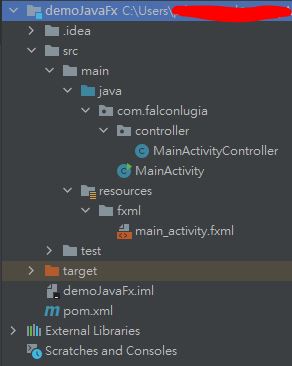
4.1.建立專案架構:
在左方Project中,src/main/java/內建立自己的套件名稱路徑:com.falconlugia
在com.falconlugia底下,再新增controllers存放fxml的controller
在com.falconlugia.controller底下,新增MainActivityController.class
修改MainActivityController.class如下:
package com.falconlugia.controller;

import javafx.fxml.Initializable;

import java.net.URL;
import java.util.ResourceBundle;

public class MainActivityController implements Initializable {

    public MainActivityController() {
    }

    @Override
    public void initialize(URL location, ResourceBundle resources) {

    }

    //離開程式時要執行的工作
    public void onClose(){
    }
}
接下來在左方Project中,resources資料夾中新增fxml資料夾,未來各項資源都是存在resources中並以資料夾做分類,Ex.audio.drawable
在fxml資料夾中新增fxml檔案:main_activity
在main_activity.fxml中,修改fx:controller為com.falconlugia.controller.MainActivityController,如下:
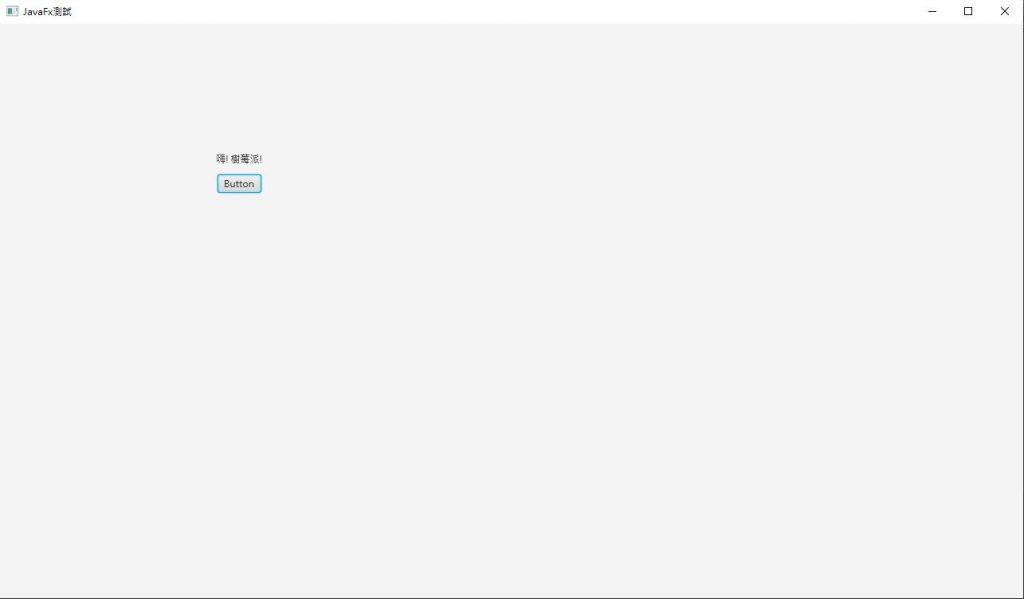
這邊加入了一些按鈕介面。
<?xml version="1.0" encoding="UTF-8"?>

<?import java.lang.*?>
<?import java.util.*?>
<?import javafx.scene.*?>
<?import javafx.scene.control.*?>
<?import javafx.scene.layout.*?>

<AnchorPane prefHeight="400.0" prefWidth="600.0" xmlns="http://javafx.com/javafx/8" xmlns:fx="http://javafx.com/fxml/1" fx:controller="com.falconlugia.controller.MainActivityController">
   <children>
      <Button layoutX="273.0" layoutY="189.0" mnemonicParsing="false" text="Button" />
      <Label layoutX="271.0" layoutY="162.0" text="嗨! 樹莓派!" />
   </children>
</AnchorPane>
然後在com.falconlugia中新增MainActivity.class,這裡是程式進入點。
package com.falconlugia;

import com.falconlugia.controller.MainActivityController;
import javafx.application.Application;
import javafx.fxml.FXMLLoader;
import javafx.scene.Scene;
import javafx.scene.layout.Pane;
import javafx.stage.Stage;

public class MainActivity extends Application {

    private MainActivityController controller;

    @Override
    public void start(Stage primaryStage) throws Exception{
        //反鋸齒
        System.setProperty("prism.lcdtext", "false");
        FXMLLoader fxmlLoader = new FXMLLoader(getClass().getClassLoader().getResource("fxml/main_activity.fxml"));
        Pane root = fxmlLoader.load();

        primaryStage.setTitle("JavaFx測試");
        Scene scene = new Scene(root);
        primaryStage.setScene(scene);
        primaryStage.setMinWidth(1300);
        primaryStage.setMinHeight(760);
        primaryStage.show();

        controller = fxmlLoader.getController();

//        primaryStage.setFullScreen(true);//以全螢幕執行
    }

}
最後整個專案架構會長得像這樣子:
回到前面說的pom.xml檔中修改程式進入點<mainClass>:
<plugin>
  <groupId>org.apache.maven.plugins</groupId>
  <artifactId>maven-shade-plugin</artifactId>
  <version>3.2.2</version>
  <executions>
    <execution>
      <phase>package</phase>
      <goals>
        <goal>shade</goal>
      </goals>
      <configuration>
        <transformers>
          <transformer implementation="org.apache.maven.plugins.shade.resource.ManifestResourceTransformer">
            <mainClass>com.falconlugia.MainActivity</mainClass>
          </transformer>
        </transformers>
      </configuration>
    </execution>
  </executions>
</plugin>
我們還沒有設定程式的Run執行方式,到IntelliJ右上角綠色鐵鎚旁邊點選Add Configuration…
點擊+,選擇Application,Name可以自訂:Run_Main
Main class選擇程式進入點:com.falconlugia.MainActivity
現在可以按下run來看到畫面了!
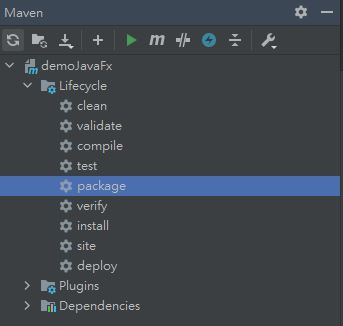
4.2.打包為jar檔
IntelliJ的Artifacts打包方式在這邊不試用,這邊要使用Maven來做打包。
開啟右方Maven的功能區,選擇Lifecycle底下的package,右鍵/Run Maven Build
成功完成後會看到:
[INFO] ------------------------------------------------------------------------
[INFO] BUILD SUCCESS
[INFO] ------------------------------------------------------------------------
[INFO] Total time:  5.361 s
[INFO] Finished at: 2021-01-25T16:45:26+08:00
[INFO] ------------------------------------------------------------------------

Process finished with exit code 0
然後到左邊專案區的target中就會產生一個demoJavaFx-1.0-SNAPSHOT.jar的檔案,對他點選右鍵->Run xxxxx,即可看到如上面畫面的執行結果。
5.在Raspberry Pi中執行JavaFx程式檔案
將剛剛產生的demoJavaFx-1.0-SNAPSHOT.jar檔傳送到Raspberry Pi中,並使用java指令執行:
java -jar /home/pi/Desktop/demoJavaFx-1.0-SNAPSHOT.jar
看到畫面出現:
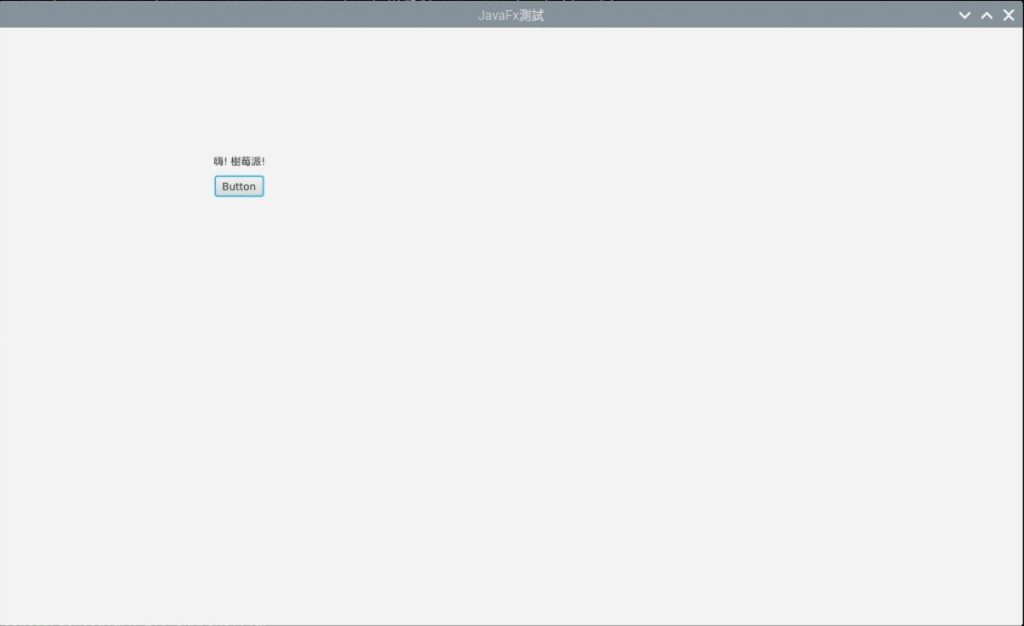
成功!!
到這邊為止,我們成功在樹莓派上執行了JavaFx的程式,而且打包出來只會有一個jar檔,也只要簡單的指令就能執行(前置作業很麻煩就是了XD),未來在部屬與更新程式上,也會方便許多。
-END-
發佈留言